Become a Better Researcher

Our research problems are unique and our genealogy software, to be useful, must be flexible enough to match our respective problems and our respective methods. The Master Genealogist is that software, but power and flexibility has a down side. The more options a program has, the more decisions the user must make. This year, the Tri-Valley TMG User Group will explore those options and make some of those personal decisions. Would you like to play along with us? Do each month's assignment, and if you like, e-mail it to us at: tvtmg.chair@L-AGS.org. We'll post some of the completed assignments on this blog each month. Let's hear it for choices!

Tuesday, November 10, 2015

TMG and Indexing - Final Thoughts

If you plan to publish a book, you will need to index that book. Therefore, you need to make some decisions, and you should make those decisions sooner, rather than later. Whether you have carefully crafted each tag to fit into the narrative, or whether your narrative is derived from one long memo tag, you need to make some choices.

Your narrative consists of carefully crafted tags without extensive memos

In this case, TMG can automatically create your index from the name variations used in each of those tag sentences. Review our discoveries in our July meeting on indexing. Choose your TMG index options and create name variations that fit your tag sentences and, as much as possible, create good index entries.

Your narrative consists of basic telegraph sentences and narrative tag memo chunks or a single, large narrative memo tag

You must choose a method to index names (and places) in those long memos. As I see it, you have three options.
  1. Manually mark each entry for indexing. Pros: (a) You can create the exact index entries you desire; (b) You can create multiple entries for each person or location. Cons: (a) This is tedious; (b) This is prone to error; (c) This lacks flexibility, if you want to change the index format. Warning: If your index combines TMG indexing of telegraph sentences with manual indexing of memos, make sure that the formats match.
  2. Use witnesses and roles for all names in your memo fieldPros: (a) Perhaps not error-free, but compared to manual index entries, this may be as close as you can get; (b) All methods require manual work, but this seems to be the easiest; (c) Since TMG is providing the index options, even when changed, the format is consistent for TMG sentences and for memos. Cons: (a) I'm not sure there's a way to create multiple index entries for a single name; (b) It may require imagination to combine the name variation necessary for the index entry with the name variation desired in the narrative paragraph; (c) Your index entries are likely to be inconsistent. Warning: You must create narrative memo tags in manageable chunks - otherwise, you'll be creating dozens of roles to handle dozens of people.
  3. Create a concordance file. Pros: (a) This probably yields the most professional result; (b) All indexing options are in the author's hands, since it even indexes the output of TMG's sentence tags. Cons: (a) Once prepared, the concordance file offers a lot of flexibility, but preparing it is laborious; (b) Names in memos must be marked with either the personal ID number or the reference number - less work and less error-prone than manual indexing, but still tedious. Warning: If using the ID number to mark your names, don't renumber your TMG database!

Summary

  • Creating a Name-Variation tag for standard index names might be a good idea, regardless of the indexing method you choose.
  • Some of the extra work creating the concordance file might be eliminated if you create a given-name-only name variation for each person. (Suggestion, not necessarily a recommendation)
  • I'm a telegraph sentence-narrative memo journal report creator, so I would be choosing from among the last three options. This is my personal evaluation.
    • If I choose to think about indexing at this point in the game, all three will require tedious memo markup.
    • Method (1): Most error-prone; least flexible; good final result.
    • Method (2): Least error-prone; reasonably flexible in index formatting; not very flexible in changing name formats consistently; least professional final result,
    • Method (3): Most flexible and consistent in name format and index format; most professional final results; requires the most preparation work.
None of these methods is perfect, and all require some work. Personally, I would probably go with Method (3), and am considering beginning the memo markup and the creation of Name-Index variations from this point forward. Regardless of your preferred methodology, if you plan to publish a family history, you must create an index. Choose your indexing method sooner, not later.

The Final Concordance Index

Believe it or not, once the concordance file has been created, the rest of the process is a snap!
  • Run your preferred TMG Journal report and export it to Word. If you want places included in your index, select those options, but do not select any of the person index options. (Consider creating a concordance file for places. Just run a List of Places report to Excel and create the two desired columns from the output.) Perform any formatting tasks on your Word document before inserting the index.
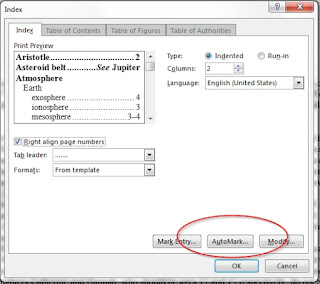
  • These instructions and illustrations were created with Word 2013. Your Word version may be slightly different. References > Insert Index > AutoMark. Navigate to your concordance file and click Open. Voila! Text values appearing in the concordance file's left-hand column and in your narrative have now been marked with the right-hand column index entry.
Index options in Word showing AutoMark button
  • Now, it's necessary to delete all those personal ID numbers. Will my method work for you? Although my citations may include numbers, usually years, in parentheses with no other characters, e.g., (1856), all those entries in my narrative include some modifiers, e.g., (1843-1898) or (b. 1862). Therefore, I can use Word's Find and Replace function to quickly delete the ID numbers in my narrative.
    • Select the narrative (Place the cursor anywhere in the document body and Ctrl-A).
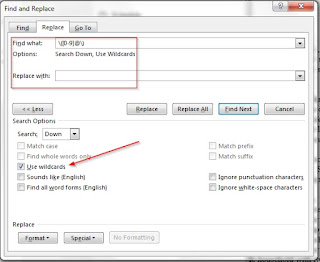
    • Replace, and with the wildcard option selected, replace all instances of numbers only within parentheses. To eliminate a double space, I also include the preceding space in my "Find what" box.
Word's "Find and Replace" screen
    • That goobledy-gook in the "Find what" box tells Word to search for all instances of this text string: space (any number between 0 and 9 appearing any number of times). For example, it will find any of these: (132), (17054), (2648), but will not find these: (b. 1862), (--?--), (1852-1854).
    • If you're confident that you use this format only for ID numbers, you can hit "Replace All" and be done. It doesn't take long to go through the document replacing one at a time, though.
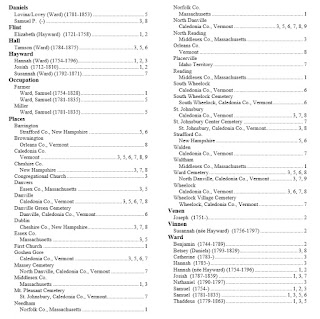
  • Finally, turn off all formatting symbols (click the ¶ mark) in the ribbon on the Home tab. Place your cursor where you want to insert the index. References > Insert Index > Make all format modifications > OK. It's done - and it's beautiful!
Final index for this short test narrative
Would you like my final thoughts on indexing?

Creating a Concordance File with TMG

Now that I know what I want my concordance file to look like, I want an easy way to create it. The first problem is selecting the names that belong in this file. I do not want to create a concordance file from every name in my database. What I want is a file that includes only those people appearing in my narrative report.
  1. I need to select all the people named in my report for addition to the concordance file. If my memo fields name people not in my TMG database, those names must be added to the concordance file manually. Personal opinion: For reporting purposes and for research purposes, all those people, related or not, should be part of the TMG database.
  2. I need to include all name variations for each person in the concordance file.
  3. I need to include the database ID number for each person.
  4. I need to include the years of birth and death, if known, for each person.
  5. My final result must be a two-column Word document.
  6. The left-hand column must include all the various ways in which a person's name might appear in the narrative report followed by that person's ID number in parentheses.
  7. The right-hand column must appear in this format: Surname:Given name variation (yyyy-yyyy).
I know of no TMG report that will create this result in one step. Excel's CONCATENATE function, though, should let me create the desired column contents, and those columns may be copied and pasted into my Word document.

Choosing the Report

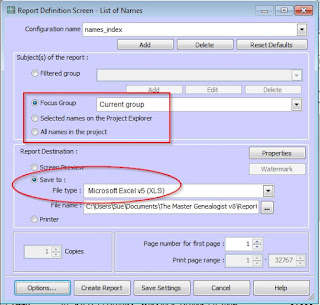
The two logical report possibilities are the List of People report and the List of Names report. Column options for the List of People report allow only primary names, and since we want all name variations included in our concordance file, our best report option is the List of Names report. The Focus Group, the Project Explorer, and "All names in the project" options for the subjects of this report all allow one to include all name variations, and the Excel output allows a lot of flexibility in creating the final column contents.
Report Definition screen - List of Names report
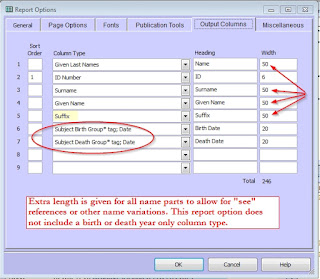
Concatenating the first two output columns will yield the desired left-hand column for the concordance file. The List of Names report does not include a year-only option for the birth and death dates, so Excel's handy RIGHT function will create columns with birth and death years only. Concatenating columns 3-5 and the 2 trimmed columns 6-7 will produce the desired right-hand column of the concordance file. (No, this is not a spreadsheet how-to post. If you're unfamiliar with these functions, there are lots of complete explanations already online.)
Report Options - Output columns

Selecting the People

It's easy enough to select all the related individuals in a genealogy narrative. Add the progenitor to an empty focus group, and then add the descendants, the ancestors, the spouses, and finally, all name variations. If your narrative does not mention any unrelated people, your selection stage is done. A good narrative, however, usually names friends and associates. Personal opinion: Those people should appear in your index, too. Here's how I add those people to my focus group.
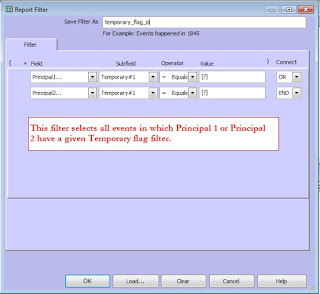
  • My selection method: With your focus group as the starting point, change the Temporary flag (You do have one, don't you?) of all the members to X. Now run a List of Events report identifying all associates of the focus group members. These people will be attached as witnesses to some event in which your focus group member is a principal.
Report filter for List of Events report
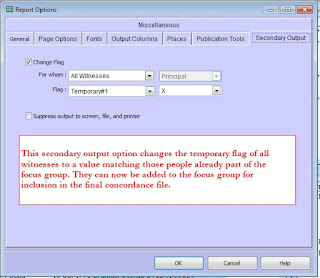
  • On the Secondary Output tab of the Report Options screen, change the Temporary flag value of all witnesses to match that of those in the focus group.
Secondary Output tab of the Report Options screen
  • Now, it's easy to filter the Project Explorer for everyone with this Temporary flag value, select all, and add to the Focus Group. Once you confirm that all name variations for each individual have been added to the Focus Group, the selection process is complete.
  • Do you have an easier method? I would love some ideas!

Running the Report

  • I run the report using the Focus Group as the subject. The resulting Excel file is CONCATENATEd and RIGHTed to create two columns with the desired content - and the work is still not done. ☹
    • Given names only should be marked for indexing, so entries for them need to be created.
    • Entries need to be created for names associated with generation numbers; e.g., Samuel2 Ward.
    • Index entries need to be standardized.
  • Once both columns are satisfactory, copy them and paste them into a Word document. Save the Excel file. If you modify your TMG narrative report, you can add new names to the concordance file with less effort than creating a new one. If you want to change your index entry format, it's easy to do in Excel.
  • The font family used in these columns should match that in your TMG narrative report. Once that is finished, so is the concordance file. Whew! What now?

What on Earth is a Concordance File?

One of the newer resources for TMG users is Michael J. Hannah's online book, "Customizing TMG - Using It My Way." It's amazing how many different ways one can solve a problem with TMG! Michael and I have frequently chosen different methods, but I always learn something from his choices. Since Michael was one of the contributors to the TMG-L thread on indexing, I checked out his section, "TOC and Indexes." Surprisingly, that section did not mention roles. Instead, the index method used a concordance file.

What on earth is a concordance file? As Michael's entry states, "The concordance file is a Word document containing nothing but a single, two-column table and no text outside the table. The first column contains a word or a phrase to be searched for throughout the report and indexed, and the second contains the text for the entry." He also gives easy-to-follow instructions on using that concordance file to create an index in a Word document. I followed them, and quickly discovered a problem. I had a lot of different Samuel Wards in my short test narrative - and each mention of the name "Samuel Ward" resulted in an index entry for every one of those men! I needed to rethink my concordance file, the TMG report I used to create it, and ... I also decided to consult the Chicago Manual of Style and Robert Charles Anderson's The Great Migration index to learn a few indexing principles. After all, it's very difficult to create something when you don't know what it is you want to create.
  • I needed a TMG narrative report and a concordance file that uniquely identified each individual.
    • TMG allows the inclusion of each individual's ID number and/or reference field. My use of the reference field is not consistent, so I opted to include the ID number in my reports.
    • The ID number is enclosed in parentheses, so I did the same after every name in my memo field. A concordance file only marks the first appearance of the name in each paragraph, so I didn't worry about marking each individual's name more than once.
Tag entry screen showing ID numbers appended to names in the Memo field
  • With the unique identifier problem  solved, I now needed to determine what my index entries should look like.
    • Keeping ID numbers in my index would be confusing for readers, but a lot of unidentified Samuel Wards in the index won't be helpful either. I decided I wanted to include the life span; e.g., Samuel Ward (1781-1835).
    • What about indexing women's names? Under both maiden and married names? Under maiden names only? CMOS offered some options and TGM include example possibilities.
    • What about instances of a.k.a. names or alternate spellings in the text? Should I index those and use a "see" reference; e.g., "Howard, Sucha (see Hayward, Susannah) (1792-1871)? Or should these name variations appear in their own right in the index with no reference to any other name variation? (Note that the inclusion of quotation marks in the index entries causes problems.)
  • What about those many occurrences in a narrative in which only the given name appears? How will I work that into the concordance file?
You will probably choose options that differ from mine, but the important thing is to make those choices in advance. This is what I decided I wanted my concordance file to look like.
Concordance file for Samuel Ward narrative
  • The colon following the surname creates an index with levels. Level 1 is the surname; given names are indented and follow the surname entry.
  • Women are indexed under both maiden and married surnames.
    • If indexed under a married surname, the maiden surname, prefaced by "née", is enclosed in parentheses, a CMOS option.
    • If indexed under the maiden surname, married surnames appear, each enclosed in parentheses, in chronological order, a slight variation on TGM.
  • A name variation is indexed with a "see" reference to the person's birth name index entry or with variations separated by slashes; e.g., Lovina/Lovey.
  • The left-hand column includes all the TMG name variations for each person.
  • The left-hand column also includes an entry for a person's given name only. A married woman's given name appears multiple times because I wanted an index reference under each married surname and the maiden surname.
Now, how do I create this concordance file? That is the topic of the next post.

More on Indexing

If you plan on using TMG to create the basis of a 500-page book, then it's a good idea to study the various options in TMG's indexing feature. We covered a lot of those options in our July 2015 meeting, recapped in four parts. If you plan to include extensive and beautifully written narratives in that book, you may want even more from TMG's index. Is it possible to index TMG's narrative memos reliably, consistently, and easily? That's the problem that plagues one of our members, and he brought his questions to the RootsWeb TMG-L mailing list. I followed that message string and decided to test what appeared to be the simplest suggestion: using Witnesses in specific Roles.

My Memo field
My Journal reports usually consist of a telegraph paragraph comprising the subject's BMDB tags and memo fields in my custom Comments tag - and source citations, of course. Since I focus on shorter research articles, I seldom worry about indexing, but if I did, how easy would it be? I could manually enter indexing codes in the above memo, but according to replies by Michael Hannah and Terry Reigel, adding Witnesses with Roles to this memo would result in index entries, too. Let's try it!

Tag entry screen showing Memo with Roles
In the example, Samuel's sons, Samuel, Thaddeus, and Josiah, have been added to the tag as witnesses. In the original memo, only the given names of Samuel Ward's sons were included in the paragraph, and the sons were not entered as a simple list. To replicate this memo, I needed to assign a separate role to each son; then, replace the given name with the role assigned to each son, selecting the "Given name" option for that role. The easiest sequence is: Right click at the point in the paragraph where the name should appear > Role > [Select relevant role] > Given name > and select. If I want to replace "Thaddeus" in the original paragraph with his role, the result of this sequence is [RG:Name2], translated as "the given name of the person assigned the role of Name2." The report output is "Thaddeus".

I simply called these roles Name1, Name2, Name3, etc., and it's very easy to add a new Name# if my memo field has several names. One could create specific name variations to be used in indexing; for example, a married woman could have an index name variation such as "Catherine Rollins (née Ward)", which TMG would index as "Rollins, Catherine (née Ward) (1807-1888)". Nice! Of course, since you might not want the name entered in the narrative as Catherine Rollins (née Ward), you would want to use only the first or given name variations in the memo entry.

Tag entry screen showing memo and witness name variation with index output
This looks like a good way to index memo entries. For someone whose narrative memo field may run to ten pages in length, however, there might be a problem. A long memo might require a lot of roles! Score one for breaking up a narrative into multiple small chunks. There is another method to be considered, not as simple, but perhaps even more powerful. Are you ready?

Tuesday, October 20, 2015

The Periodic Table of (Source) Elements

Sorry, I could not resist this post title. The following is of academic interest only, but given how often the question arises, that interest is widespread. "I've just added another source element to my custom source type, but the element seems to be added randomly on the Source Definition screen's General tab. Shouldn't it be added to the first available blank field? Or shouldn't the elements be arranged in alphabetical order? Or shouldn't the elements be arranged as entered in the Source Type template? What's up with that??"

Let's take a look at the General tab in TMG's Source Definition screen.
General tab in the Source Definition screen
There are fifteen possible element fields on this screen. The first field is reserved for elements from the Title source element group. The remaining fourteen element fields can be filled by any one element from 23 source element groups. Those source element groups are added to this table in a specific order:

Title
Short TitleSecond Location
SubtitlePublisher
Short SubtitlePublisher Location
Record TypeSeries
AuthorEdition
SubjectVersion
CompilerVolumes
EditorPages
Second PersonFile Reference
DateRecord Number
Second DateFilm Number
Location

Take a look at the TMG screenshot. If we were to add the [SHORT TITLE] element to this screen, it would not appear in the first available blank spot (the second label in the second column). It would pop into the first label spot in the first column, and all the rest would move down. If we were to add an element from the Publisher source element group, it would be inserted between our Location element and our Description element, which is defined as part of the Series source element group.

Try it! Let me know if you think I've made an error in this Periodic Table of (Source) Elements. Again, this is of academic interest only. Knowing this won't make any difference in how you use TMG.

Monday, October 19, 2015

Recapping Our October Meeting - Part Three

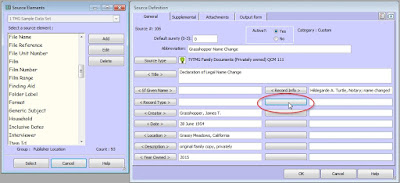
Let's take a look at a few screenshots. One of the tricky problems when defining a source type definition by hand is that a list of non-conflicting source elements isn't readily available. If you base your source type on a similar one, copy and rename it, and then work from the Source Definition screen, you have a way to keep that list current and handy.

Source Definition screen with available Source Elements screen on left
Suppose I want to add the "File Reference" source element to this template, but I don't know if I've already used its source element group. I can click on a blank field label and the Source Element list opens -- containing only those source elements still available for this template. Clicking on a named field label opens the source element list highlighting that named source element. You can quickly identify its source element group.

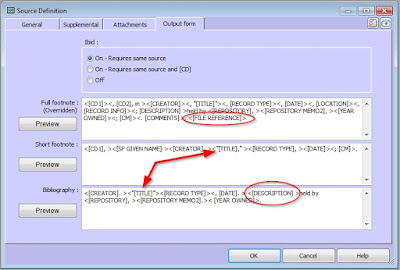
As you add and remove source elements from your Source Definition screen, you should add them to the source's various output forms -- with punctuation and word constants, as well. Although I didn't add the element [FILE REFERENCE] to this actual source, this screen shows you what happens when you do so. Note the "(Overridden)" annotation on the Full footnote.

Source Definition screen - Output form tab
The arrows point to variations in the punctuation for the [TITLE] element. The exact title of an unpublished work should be enclosed in quotation marks. How you choose to handle this in your custom Source Type template will make a difference in the citation output.
  • Removing the quotation marks from the template and entering them as part of the title will yield American-style comma and period placement, if that comma or period is included within the [TITLE] element's angle brackets, e.g., <[TITLE], >, or if there are no angle brackets in use.
  • If the quotation marks are constants and the comma or period is placed before the closing quotation mark, the output also produces an American-style sentence. The Short footnote form illustrates this example.
  • If the quotation marks are constants and the comma or period is placed after the closing quotation mark, as shown in the Full footnote and Bibliography forms, the sentence created follows English-style punctuation; i.e., the comma or period comes after the quotation mark.
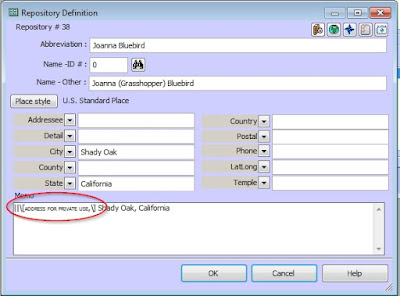
This Source Type uses our [REPOSITORY MEMO2] for the private holder's address. Exact addresses for living people are usually presented as [ADDRESS FOR PRIVATE USE], City, State. To recreate this, highlight the phrase only, right-click, and select Format > Small caps. Then, to prevent any misunderstandings by TMG, precede each square bracket with the escape character: \. Note the illustration below. If your previewed output includes [YEAR], TMG thinks those square brackets are special characters, not part of the text. Carefully re-enter the [ADDRESS FOR PRIVATE USE] section in your [REPOSITORY MEMO2] field, with the escape characters. Your citation output preview should now read correctly.

Repository Definition screen showing the escape character

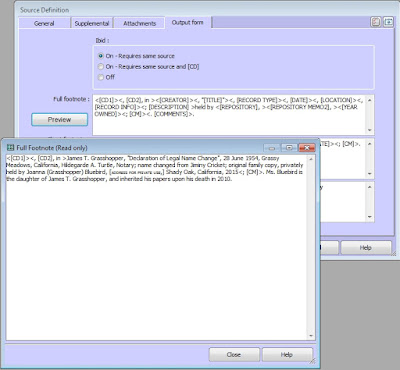
This final illustration shows the Full Footnote output. If you compare this custom Source Type to our starting template, "TVTMG Artifact (Privately owned)," you will see that very few changes were made. In fact, this template could probably be used for artifacts, as well as those documents found in private family files. It probably needs a little tweaking, but I'll leave that up to you.☺ Note that I left the [CD] elements in this template. These are unnecessary for this specific document, but a multi-document file might require them.

Comparing the Full Footnote definition and output


Recapping Our October Meeting - Part Two

Reviewing our finished citation (compare to EE QuickCheck Model, p. 111, "Private Holdings: Legal Document, Unrecorded Family Copy"):

James T. Grasshopper (originally known as Jiminy Cricket), "Declaration of Legal Name Change," 28 June 1954, Grassy Meadows Co., California, Hildegarde A. Turtle, Notary; original family copy, privately held by Joanna (Grasshopper) Bluebird, [ADDRESS FOR PRIVATE USE,] Shady Oak, California, 2015. Ms. Bluebird is the daughter of James T. Grasshopper, and inherited his papers upon his death in 2010.

These are the "source elements" I see in this citation: 1) Author or Creator, 2) Title or Record type, 3) Date created, 4) Place created, 5) Additional description; 6) Format, 7) Repository, 8) Repository address, 11) Date held; 10) Provenance. Mills also includes additional information between our "Format" and "Repository": a collection or filing name.
  • At last, it's time to check our templates to see if we already have one that would fit this citation. Those TV-TMG source types that refer to privately owned material include: TVTMG Artifact (Privately owned), TVTMG Family Bible, and TVTMG Letter (Historic-Privately Held), Several of these come close, but they don't quite fit some of our elements.
  • How about the source types included in TMG? None of them fit any better, so maybe we should create our own custom source type template for those records we're going to call "Family Documents (Privately owned)."

Customizing a Source Type Template

  1. Start with the source type closest to the desired output. In this instance, that's the TVTMG Artifact template. Highlight that source type and Copy it.
  2. Rename it as desired. Here, we'll call it Family Documents (Privately owned) QCM 111. (QCM 111 identifies the EE example on which we base a source type template.)
  3. If you feel confident, you can simply edit the source type here in the TMG Source Types list. We're going to use an alternative approach that allows more experimentation.
  4. Save the renamed source type. Then, open the Master Source List and Add the new source, our legal name change document.
  5. Select the newly created source type (yes, I know it might need some editing, but we'll take care of that later), and begin adding the desired information. What elements are missing? What problems arise?
  6. As you add information on the Source Definition Screen's General tab, flip back to the Output form tab and preview each output.
  • Our output isn't happy with our parenthetical name. Since we're unlikely to have a lot of creators requiring this, we may need to think of an alternate place in the citation for this information.
  • The [RECORD TYPE] should be preceded by a comma. We've actually used the document title, enclosed in quotation marks, for this citation. Maybe we should add the [TITLE] to the source type template? (I decided to include the [TITLE], and surrounded it with quotation marks. This way, we can use this template for more generic records, as well as those with exact titles.)
    • Add the new source element, word constant, or punctuation in the appropriate place in each output window. There should be no element group conflict with the [TITLE] source element, so it's safe to add. Note that (Overridden) now appears below the output window label.
    • Return to the General tab; enter the title of the document (Declaration of Legal Name Change); return to the Output form and preview the result.
  • Rather than [INCLUSIVE DATES], maybe we should just use a [DATE] element? (Your call. I changed my [INCLUSIVE DATES] to [DATE].)
    • To delete a source element from the source type, go to the Output form tab and delete the element and its associated punctuation from each output window.
    • Note that this does not delete any information already entered on the General tab. Update your General tab information, remembering to delete that information from the to-be-deleted source element field. When you save, close, and reopen your Master Source, you will see that the deleted element label no longer appears on the General tab.
  • We don't include a location element in this template. Add one?
  • In this source type, [DESCRIPTION] is the element used to describe the record's format and whether or not it was privately held. That works here. Since this template could be specific to privately owned material, the word "privately" could be added to the output form as a word constant.
  • The source type's [REPOSITORY], [REPOSITORY MEMO2], and [YEAR OWNED] elements work perfectly for this citation.
  • The [COMMENTS] field on the Supplemental tab is a perfect place for the provenance.
  • What do we do about our parenthetical a.k.a. information? (I rewrote it and added it at the end of the document description information, following the name of the notary.)
  • What do we do about that extra additional description? (I found that the element [RECORD INFO] was available, so I used it for all additional descriptive material that wasn't easily labeled.]
Tip: Click on one of the blank field name boxes. This brings up a list of available source elements. This is a great way to avoid choosing a source element from a group that is already included in the source type template - and get ideas for appropriate source elements.
  • As you add a source element with its information to the Source Definition's General tab, add the same source element in the appropriate place in the Output form tab. You are overriding the template, but that's okay.
  • When the citation reads as you want, it's time to copy each output form template (Full footnote, Short footnote, Bibliography) into the new custom Source Type (TVTMG Family Documents), thus completing the creation of that new Source Type. After all, you don't want to redo all this editing every time you choose to use this custom source type!
    • Copy each output form and paste it into Windows' Notepad application. Then, open the Source Types list, scroll to the "TVTMG Family Documents" source type, click Edit, and paste each new output form into its proper place.
  • Finally, edit the custom Source Type's reminder area so you will know what information fits in what element field. It's a good idea to include an example citation.
  • Click OK. You've created your new Custom Source Type.
Want to see screen shots? Continue to Part Three.

Recapping Our October Meeting - Part One

The October meeting merged our "Stump the Panel" segment with members' requests for new source type templates. In the course of discussing and problem-solving, some tips and techniques were reviewed. Perhaps the most important of these discussions centers on a problem described in this user review of the recently released 3d edition of Evidence Explained: how does the researcher determine the most appropriate citation model. Both the reviewer's post and Elizabeth Shown Mills' response should be read. Note ESM's important point: "If we don't understand the documents we are using - and the differences that exist between different types of records - then their citations will indeed confuse us." When choosing a TMG source type template, or creating a new one, the first priority is to understand the document.

Consider the first citation problem we considered: a legal name change document. On 28 June 1954, Jiminy Cricket changed his name to James T. Grasshopper via a "Declaration of Legal Name Change" notarized in Grassy Meadows County, California. This document was found in the family files of James Grasshopper's daughter, Joanna (Grasshopper) Bluebird. In addition to documenting the name change, this document also included Jiminy Cricket's (a.k.a. James T. Grasshopper) date and place of birth. What template should we use to cite this source?

Before choosing a source type template, we must first understand the document.

  1. This is not a microfilm copy or digital image. Therefore, we can ignore all those templates, and it's likely that we won't need to worry about any "layered" citations.
  2. This is a legal document; however, it is not the result of any court action and the law did not require that it be recorded in any court. Therefore, it's unlikely that it should be cited with any of those templates used to cite court and government records.
  3. Despite the legal purpose and form of this document, it was privately created by Jiminy Cricket/James T. Grasshopper. This document was kept among Mr. Grasshopper's papers, which eventually found their way to his daughter. If you think about the types of records that you might have found in a similar location, you will see that this document is more akin to a family letter, scrapbook, or photograph privately held by a family member, than to a record found in a government archive or a historical society library.
  • Now, examine EE for citation principles to these family papers. Mills doesn't have a chapter called "Family Records," but Chapter 3, "Archives & Artifacts," includes a section on "Private Holdings." Doesn't that fit our document? Take a look at the examples in this section and you will see one called "Legal document, unrecorded." That looks perfect!
  • Don't skip to the QuickCheck Model and copy it down. Read the basic issues for this class of records first, and then read the discussion on basic elements and basic format for these privately held records. Basic elements include: 1) type of item; 2) description; 3) last-known whereabouts; 4) statement of provenance.
  1. Let's create a description of the item. Descriptions usually included the creator/author/subject, the title or type of item, and the date and place of creation. It should also include any other information bits necessary to uniquely identify the item. Here is our initial description: James T. Grasshopper, "Declaration of Legal Name Change," 28 June 1954, notarized in Grassy Meadows Co., California. I would like to include the original name in this description, so perhaps I would change the creator to this: "James T. Grasshopper (originally known as Jiminy Cricket)." Do I want to include the name of the notary? Knowing this name, date, and place might allow a future researcher to find the notary's record book, if the notary kept a record book, and if the notary was required to deposit his or her record books with the state commissioning authority or the county court. Although this information probably won't be required in a publication citation, we could still include it in our personal working citation: "Grassy Meadows Co., California, Hildegarde A. Turtle, Notary." This is our complete description of this document: James T. Grasshopper (originally known as Jiminy Cricket), "Declaration of Legal Name Change," 28 June 1954, Grassy Meadows Co., California, Hildegarde A. Turtle, Notary.
  2. It's usually a good idea to identify the format of any record you saw before you tell everyone where you saw it. This is the original family copy of this document.
  3. Now, it's time to describe the last-known whereabouts: privately held by Joanna (Grasshopper) Bluebird, 2015. Since Joanna is happily still alive, we need to protect her exact address, although we can include the town and state: Shady Oak, California.
  4. What about the provenance? That statement can be very important to future researchers, as it helps to establish the credibility of the information a record contains. "Ms. Bluebird is the daughter of James T. Grasshopper, and inherited his papers upon his death in 2010."

Here's our preferred citation:

James T. Grasshopper (originally known as Jiminy Cricket), "Declaration of Legal Name Change," 28 June 1954, Grassy Meadows Co., California, Hildegarde A. Turtle, Notary; original family copy, privately held by Joanna (Grasshopper) Bluebird, [ADDRESS FOR PRIVATE USE,] Shady Oak, California, 2015. Ms. Bluebird is the daughter of James T. Grasshopper, and inherited his papers upon his death in 2010.

Are you ready to enter this document in your Master Source List? Then continue to Part Two.

Tuesday, July 21, 2015

Recapping the July Meeting - Part Four

Your TMG report may include an index, but that index is not printed by TMG. It must be populated by your word processor program. I'm sure the manner of doing this varies from program to program, but all of them probably have a dialogue box that allows you to format that index before it is inserted into the document. You should experiment with these options, too.

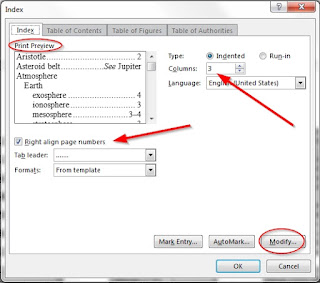
Word index dialogue box
This screenshot shows the format options we selected at our meeting. Note that as you change these options, the Print Preview will show them in action.
  • The indented format was already selected when we opened the dialogue box. It matches our selection in TMG. This is a TMG format choice that can be changed in the word processor.
  • We chose to use a three-column format. It saves paper, and it is easily read.
  • Note that we chose to right-align the page numbers and included a leader. This choice made our index look neat and clean, and it was very easy to read.
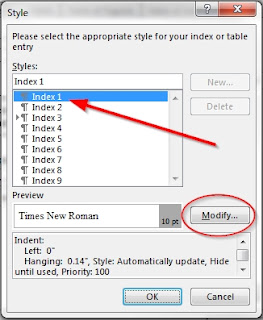
That's as far as we got at our meeting. We created a very satisfactory index, but I wanted to play a little more. I decided to investigate that Modify button, circled in the screenshot. This is what I found.
Index style dialogue box
This dialogue box allows the user to select an index level and modify its style. In my index, I modified the font size, font weight, and paragraph spacing for Level 1, and I modified the font weight for Level 2. Voila!
The index
The indexing options in TMG and your word processor deserve exploration. A book-length publication without an index will not be read, and you have wonderful tools to make sure your well-researched, well-documented book is also used and enjoyed.

For more information on TMG indexes, read Barbara Grempler's article on the WhollyGenes forum. Don't forget TMG's help file! Whenever you're investigating a TMG feature, you should always check it out.

[Note that the help file claims that one can enter a person's ID number in the manual code, instead of that person's name. Perhaps that worked in an earlier version of TMG, but I have been unable to make this work in version 8. I have not tested it yet in version 9.]

Recapping the July Meeting - Part Three


 You've played with all TMG's indexing options, and you now have an index you like. How can you make your manually coded index entries match? Let's look at how Word sees TMG's indexing code. Our manual codes should match this format.

Word page showing indexing codes
The easiest way to show all the various codes contained in a Word document is the click the paragraph icon (highlighted by the red arrow in the image above). This illustration comes from a Word 2013 document. Your version of Word may not look exactly the same, but it will contain this icon somewhere. Important! Before populating your index, click this icon again to hide the codes. They add a lot of pages to your document.
  • The index code shown for the name Thaddeus Ward is: {xe "People:Ward:Thaddeus (1779-1863)"}. The colon separates index levels, so Level 1 is People (TMG's index name); Level 2 is Ward (TMG's surname); and Level 3 is Thaddeus (1779-1863) (TMG's given name and lifespan). If we hand code this in a TMG memo field, this is what we would enter. Word won't see any difference in the automatic TMG entry or the manual entry.
    • [INDEX:]People:Ward:Thaddeus (1779-1863)[:INDEX]
Place names are a little trickier to code, because we chose to include index entries by detail, city, and county. Thaddeus Ward died in Danville, Caledonia Co., Vermont. If we were manually coding this in a memo field, we would need to create an index entry for Danville and for Caledonia Co.
  • Analyzing Word's code for Danville, we see {xe "Places:Danville:Vermont, Caledonia Co."}. Again, index levels are separated by colons, so Level 1 is Places (TMG's index name); Level 2 is Danville (TMG's city); and Level 3 is Vermont, Caledonia Co. (TMG's containing place elements, largest to smallest). Here is TMG's manual entry for the same index code.
    • [INDEX:]Places:Danville:Vermont, Caledonia Co.[:INDEX]
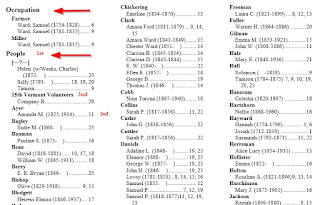
Do you remember the Occupations section of the index? It was created by entering this index code in a memo field: [INDEX:]Occupations:Farmer (or other relevant occupation):Surname, Given Name (Year-Year)[:INDEX].

Manual index code for an Occupations index
You are not limited to People, Places, and Marriages indexes. If you choose, you can create some interesting indexes of your own. What would these look like?
  • [INDEX:]Ministers:Surname: Given Name (Year-Year)[:INDEX]
  • [INDEX:]Ships' Passengers:Ship name:Surname, Given Name (imm. Year)[:INDEX]
  • [INDEX:]Cemeteries:Cemetery (City, State):Surname, Given Name (Year-Year)[:INDEX]
TMG allows up to three levels of index codes, but if you choose to create an index with your word processor, you will be able to create additional levels.

"This is a lot of work!" you say. You're right. If you determine an indexing format you like, and you stick with it, adding index codes in TMG as you enter your data will streamline this effort. If you plan to vary your index content and format, you should consider skipping TMG's index and create your index, start to finish, with your word processor.

Ready to format your index? Head to Part Four of this meeting recap.

Recapping The July Meeting - Part Two

The contents of our index is determined by the choices we make in the Indexes tab in the Report Options screen and the manual index codes we insert in our memo fields. This screen shows our choices, and you can read some of our discussion points.

Experiment with the options on this screen until you get the index you prefer.

Indexes tab in the Report Options screen
  1. Our People index section includes a surname index. There is no separate index by given name. Included in each entry under a specific surname is the given name with the lifespan, years only, in parentheses. Because we did not include a given name index, checking or not checking "Combined index" in this section is irrelevant. (Note that I could not see any difference in the index if "Also use sort template" was checked or not.)
  2. Three different place elements are included in our Places index: place detail (L2), city (L3), and county (L4). The larger containing elements for each one are listed largest element first; e.g., "Vermont, Caledonia Co." are the larger containing elements for index entry "Danville."
  3. Although we played with the Marriages index, we did not include it in this report. Note that separate bridge and groom indexes can be created or the two can be combined.
  4. Checking "Combined index" in this area combines the People and Places indexes. This might be okay for a small report, but might be very confusing for a larger report.
  5. We liked the appearance of the index when the subheadings were indented. It seemed very clean and clear. Would you like to know what the index looks like when "Merge all indexes" is checked? Experiment! :-)
If you include extensive narratives in your journal reports, you must also index those narratives. This can be done in Word (or your word-processor of choice), or it can be done in TMG. Of course, you want your manually coded index entries to match those created by your TMG option choices. Are you ready for Part Three?

If you don't want to mess around with adding index codes to your TMG memo fields, but you do want to learn more about formatting your index, skip Part Three and head straight to Part Four.

Recapping the July Meeting - Part One

There's a lot more to creating an index than meets the eye! That's what I took away from the first half of our July TV-TMG User Group meeting.
  • Not all TMG reports include an option to create an index - and those that do require that the report be sent to a word-processor. We chose a Journal report for our experiment.
  • Creating an index in TMG is only the first step. That index must be populated in the word-processor, too. Most of us use Word, so we continued the experiment by exploring some of Word's indexing options.
  • TMG allows the inclusion of indexing codes in memo fields. Before entering those codes, it's a good idea to determine your preferred indexing format. You want the final index to be consistent, whether the code came from a memo field or from a tag's sentence.
Let's start with our final index and work backwards, looking behind the scenes in both TMG and Word.
People section of index
Places section of index
If we analyze the content and format of this index, our choices - and alternatives - will become clear.
  • The People and Places sections are separate. This is not a combined index.
  • There are three columns.
  • There are potentially three indexing levels in both sections. The levels are indented.
    • Level 1 (the type of index - People or Places [Occupation will be discussed later]
    • Level 2 (Surname or Place name)
    • Level 3 (Given name or Place container elements, largest to smallest)
  • In TMG terms, the Places index includes three elements: the Place Detail, the City, and the County, in Level 2. Each Place Detail includes its containing state, county, and city in Level 3. Each City includes its containing state and county in Level 3. Each County includes its containing state in Level 3.
  • Level 1 and Level 2 have been formatted in bold face, and the Level 1 font type is larger than the other levels.
  • The content of this index comes from TMG; most of the format is applied in Word.
Ready for Part Two?

Thursday, June 4, 2015

Our June Meeting

Heads up!

Due to a lot of scheduling conflicts, our June meeting is the first Saturday, June 6th, at the usual time and place. The first half of the meeting will be spent practicing techniques for combining two or more VCF charts. The second half of the meeting will be "Stump the Panel" time. None of us spends the time between meetings working only with the meeting topics, and questions always seem to come up that have nothing to do with VCF charts.
  • Do you have a citation question?
  • Do you want a special report, but can't seem to design it?
  • Have you made a custom tag that you think we would all like?
Bring your problems, questions, and ideas to the June meeting and try to "Stump the Panel."

Don't forget! The meeting is June 6th.

Thursday, February 19, 2015

January Meeting Discoveries

A Note from the January Meeting

We started our exploration of TMG's Visual Chartform (VCF) by working through Robin Lamacraft's first three topics (see Robin's VCF Tips). Playing with the default values allowed us to personalize some basic descendant box charts. Then, we tried to create a descendants chart that showed cause of death, a bit of data I have entered into Memo2 in my death tag. Oh, no!!! It didn't work correctly - until we included the Memo1 field in the list of "Data Types."

Since I really didn't want Memo1 information in my chart, I started exploring and discovered that there is a bug in the VCF program. You can read about the problem in the Wholly Genes Forum under this topic. Fortunately, there is a work-around described by Virginia Blakelock. Something must be entered in Memo1, or the VCF misses the split. Virginia uses the '>' character, but I wasn't too happy with that option. Instead, if Memo1 is blank in my death tag, I enter sensitivity brackets, {}. This way, nothing prints in any report that I don't want printed. Does anyone see a problem with this?

Death tag showing sensitivity brackets in Memo1 field
With this little trick, I was able to print a descendants box chart that was color-coded for cause of death and included a more detailed statement of cause of death in the data included on the chart. Here's a JPG example of the resulting chart. Nice features like a legend have not been added. That is a topic for a future meeting.
VCF descendants box chart showing cause of death